Friday, March 7, 2014

Map Reading

Map Grid Reference

The numbers going across the map from left to right are called eastings, and go up in value eastwards, and the numbers going up the map from bottom to top are called northings, because they go up in a northward direction.
There are two main types of grid reference:
  • four-figure grid reference, such as ‘19 45’, indicates a 1 km by 1 km square on the map; and
  • six-figure grid reference, such as ‘192 454’, indicates a 100 m by 100 m square on the map.
Sometimes you may also come across:
  • eight-figure grid reference, such as ‘1926 4548’, indicates a 10 m by 10 m square on the map; and
  • ten-figure grid reference, such as ‘19267 45487’, indicates a 1 m by 1 m square on the map
In practice, it’s the six-digit grid reference number that is most commonly used, although the more digits used gives you a more precise location. GPS devices often specify at least eight-digit grid reference numbers.
Four-figure grid references
When giving a four-figure grid reference, you should always give the eastings number first and the northings number second, very much like when giving the reading of a graph in school, where you give the x coordinate first followed by the y.
An easy way to remember this is that to get the first number, you go along the corridor (horizontal, x axis, eastings) and then up the stairs (vertical, y axis, northings).

For example, the number 2 in the diagram below is square 19 across and square 45 up and therefore, the four-figure grid reference is ‘1945’.
Grid references main squares
The numbered squares on the diagram above have the following four-figure grid references:
1 = 18 45
2 = 19 45
3 = 18 44
4 = 19 44
Six-figure map references
To get the six-figure grid reference, you have to imagine that the four-figure square is further divided up into tenths.
In the example below, the grey box is in the four-figure grid reference square ‘18 44’, but more accurately it is 7 tenths across and 8 tenths up within that larger grid square, therefore the six-figure map reference is ‘187 448’.
6-figure grid references
The shapes on the diagram above have the following six-figure grid references:
Grey square – 187 448
Red dot – 185 443
To be sure there is no doubt or confusion about which National Grid you’re referring, when you quote the six-figure grid reference you should put the two letters of the area you are in before the numbers.
For example, you may be at grid reference ‘509 582’ in south-west Scotland. The complete grid reference you should quote would be ‘NX 509 582’ (without the letters the numeric reference would be repeated in every 100 km square).
Using compass romer lines
The romer lines marked on the base plate of most compasses can help you to get a more accurate grid reference. You choose the scale of the map you’re using and then move the compass base plate over the map to show the tenths within a map square. This is more accurate than guessing the tenth gradations within a square

Thursday, January 16, 2014

Temasek Primary Event Reflection

Today I went to Temasek Primary for a competition. Although my school did not win anything there, I have learnt a few things through the camp. I have learnt that we have to work together and help each other if we want to win, covering each others weaknesses with your strengths. I have also learnt that when we lose, we must have good sportsmanship and congratulate the winning party.

Thursday, January 9, 2014

Scientist Badge

                                                         Experiments
Number One
Aim : to find out the direction that a freely suspended bar magnet will come to rest in.
Materials needed : A bar magnet, a retort stand, sticky, thread.
Prodecure to carry :
1) Make sure there are no magnetic or magnet objects around you.
2)Hang a bar magnet from a retort stand using a piece of tread as shown.
3) Wait for the magnet to come in a rest.
4) Use a compass to check the direction which the compass comes to rest in. It should be in the North-South direction.
5) Gently spin the magnet and wait for it to come to a rest again. It should face the same position as before.
Conclusion : A freely suspended magnet always comes to rest in the North-South direction.

Number Two
Aim : To test the hardness of each material
Materials needed : Rubber Eraser, wooden chopsticks metal nail.
Procedures to carry :
1) Think of a way to test the hardess of the objects
 Way : Use the objects to sratch each other to test the hardness. the on that has no scratches is the hardest while the one with the most scracthes is the softest.
Conclusion : Hardness of an object can be tested by scratching them.
Number Three
Aim : To find out if our skin can accurately measure temperature
Materials needed : Hand, a basin of warm water, a basin of cold water and a basin of tap water.
Procedures to carry out :
1) Place your left hand into the tub of cold water
2) Place your right hand into the tub of warm water
3) After a 45 seconds, place both hands into the tub of warm water and write down what you feel.
Observations :  My right hand feels cold while my left hand feels warm.
Conclusion : Our skin cannot detect temperature accurately, it only compares the temperature of the last objectand the current object. To measure the temperature accurately, we must use a thermometer

First Aid

The basic thing about first aid is to know how to help if somone is in need. The other things you will need to know includes calling someone for help, dialing the ambulance ( 995 ) and dialing another ambulance ( 1777 )

Calling for help
When helping someone, if you are unsure of what to do, please do not take any action as you may injure the person further. Instead, call an adult for help. If none is present at that time, seek the best that you can. If all fails, dial either one of the ambulances.
Dialling the Ambulance
There are two types of ambulances. One is the one that is only dialed for if it is a real emergency. Such examples are : The person has fainted, bleeding profusely or needs extensive help immediately. the ambulance will arrive in roughly about three- ten minutes depending on the distance apart. Another one is the one that is called when it is still an emergency but not as serious as the ones mentuioned above.
Such example are : An extremely bad stomache, Extremely bad headaxche or broke your bone ( a minor break but still serious )

First Aid Kit
These are the basic things that you should have in your fist aid kit :
Antispetic Cream
Triangular Bandage
Sciccors Tape
Plaster Cloth
Alchol Swab
Cotton Buds
Tweezers

Uses of basic things

Antispetic Cream : To kill the bacteria and help in healing cuts and scars
Triangular Bandage : Uses are mentioned in Scout Uniform Post
Sciccors :  Must be clean ! To cut the tape.
Tape : To bandage the wound
Plaster : To Stick on wound
Cloth : To clean wound
Alchol Swab : To kill all germs in the wound thoroughly
Cotton Buds : To dab medicine onto the wound

Tweezers : To pick things used up as your hands may contain germs and spread it to the wound when used


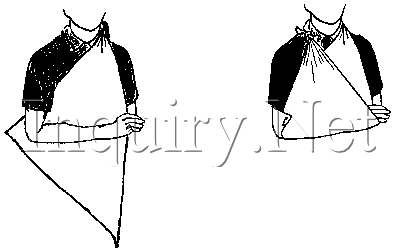
Here's how to use a triangular bandage :
 
 
To make a large arm sling spread the bandage, as shown above, down the front of the victim's body. Carry one end over the shoulder on the uninjured side and bring it around behind the neck so that the end just hangs over in front on the injured side. Carefully place the bandage point behind the elbow, and gently bend the arm across the center of the bandage. Bring up the second end and tie to the end at the shoulder, making the knot (use a square knot) at the side of the neck, not behind.
The sling when it is completed should support the arm so that the little finger is slightly above the elbow. Finish it off by bringing the point forward around the elbow, and fasten it with a safety pin.
 

Aidiji Yell

Adiji adiji ah-oo-ah
Adiji adiji zim-boom-bah
A-oo-ah
Zim-boom -bah
Rah Rah Rah

Hockey Pockey


                                                                                    Lyrics
Right
You put your right hand in
You put your right hand out
It goes in out in out shake it all about
You do the hokey pokey and you turn yourself around
That's what its all about

Left hand
You put your left hand in
You put your left hand out
It goes in out in out shake it all about
That's what its all about

Everybody Sing
Hey hokey pokey
hey hokey pokey
That's what it's all about

Right
You put your right foot in
You put your right foot out
It goes in out in out shake it all about
That's what it's all about

Left foot
You put your left foot in
You put your left foot out
It goes in out in out shake it all about
That's what it's all about

Everybody Sing
Hey hokey pokey
hey hokey pokey
That's what it's all about

Butt
You put your butt in
You put your butt out
It goes in out in out shake it all about
That's what it's all about

Whole self
You put your whole self in
You put your whole self out
It goes in out in out shake it all about
That's what it's all about

Prayer


Dear God,
Please protect my family and I and make sure we are safe our entire life.
Allow us to have a happy and enjoyable life. Help us through our difficulties
and guide us along the way. Please do not let any harm come our way.